Automation of mobile applications testing is an important aspect of software quality assurance in the conditions of their popularity growth. The article presents an approach to automating testing of applications for Android platform using Appium tool, Selenide library and
Page Object Model (POM) design pattern. The steps of environment setup, including installation and configuration of Appium, Android SDK and additional components are described in detail. As an example, a test for the Messages application is implemented, performing the text input “Hello World” and sending a message. The results demonstrate the effectiveness of the approach in creating readable, scalable, and maintainable tests. The advantages, limitations and directions for further research are discussed.
Keywords: test automation, mobile applications, Appium, Selenide, Page Object Model, Android, Android SDK.
1. Introduction
As mobile technologies evolve and the number of mobile app users increases, quality assurance becomes critical. Test automation helps to reduce the time to test functionality and increase the reproducibility of results. Appium, an open source tool, provides cross-platform test automation for Android and iOS platforms [1]. Selenide library, based on Selenium WebDriver, simplifies test writing with its intuitive syntax and built-in expectation mechanisms [2]. The Page Object Model (POM) pattern structures code, increasing its readability and maintainability [3].
The purpose of this paper is to develop and demonstrate a methodology for automating mobile application testing using Appium, Selenide and POM. As a case study, testing of the Messages application on Android, involving text input and sending a message, is considered. The paper is organized as follows: section 2 describes the environment setup including detailed configuration of Appium and Android SDK, section 3 presents the test methodology and implementation, section 4 discusses the test run and results, and section 5 contains conclusions and directions for further research.
2. Customizing the environment
Setting up an environment for test automation using Appium requires the installation of a number of components, including the Android SDK, Appium Server, additional drivers and project dependencies. The following are the main steps.
2.1. Installing and configuring the Android SDK
The Android Software Development Kit (SDK) is the main tool for working with Android devices and emulators. The installation is done through Android Studio available on the website [4]. After installation you need to:
- Set the ANDROID_HOME environment variable to point to the SDK directory (e.g. ~/Android/Sdk on Linux/Mac or %USERPROFILE %\AppData on Windows).
- Add the paths to platform-tools and tools to the system PATH variable to access utilities such as adb (Android Debug Bridge).
- Use the SDK Manager in Android Studio to install the required components:
— Android API Level (e.g., API 30 for Android 11).
— Android Emulator.
— Android SDK Build-Tools.
— Android SDK Platform-Tools.
- Check the availability of devices or emulators with the command:
|
adb devices |
Android emulator is created via AVD Manager in Android Studio. It is recommended to use a system image with Google APIs for compatibility with most applications. Once the emulator is created, it can be launched via AVD Manager or by command:
|
emulator -avd <avd_name> </avd_name> |
where <avd_name> is the name of the virtual device created. </avd_name>
2.2. Installing Appium and additional components
Appium is installed via Node.js (version 16 or higher), which can be downloaded from [5]. Appium installation is performed by the command:
|
npm install -g appium |
Version check confirms successful installation:
|
appium --version |
To work with Android devices, Appium requires the UiAutomator2 driver, which is installed separately:
|
appium driver install uiautomator2 |
Additionally, it is recommended to install Appium Doctor for environment diagnostics:
|
npm install -g appium-doctor appium-doctor --android |
Appium Doctor checks for required components such as Java Development Kit (JDK 11 or higher), Android SDK and environment variables.
To work with Java, you must install the JDK and set the JAVA_HOME variable to point to the JDK installation directory. Example for Linux:
|
export JAVA_HOME=/usr/lib/jvm/java-11-openjdk export PATH=$JAVA_HOME/bin:$PATH |
Appium Server can be launched via the command line or use Appium Desktop for the graphical interface. Recommended server parameters:
— Address: 0.0.0.0.0 (for access from the local machine).
— Port: 4723 (default).
Starting the server is accomplished with the command:
|
appium --address 0.0.0.0 --port 4723 |
2.3. Configuration of project dependencies
The project is created in IntelliJ IDEA using Maven. Dependencies include Appium Java Client, Selenide, and TestNG for test organization. The pom.xml file contains:
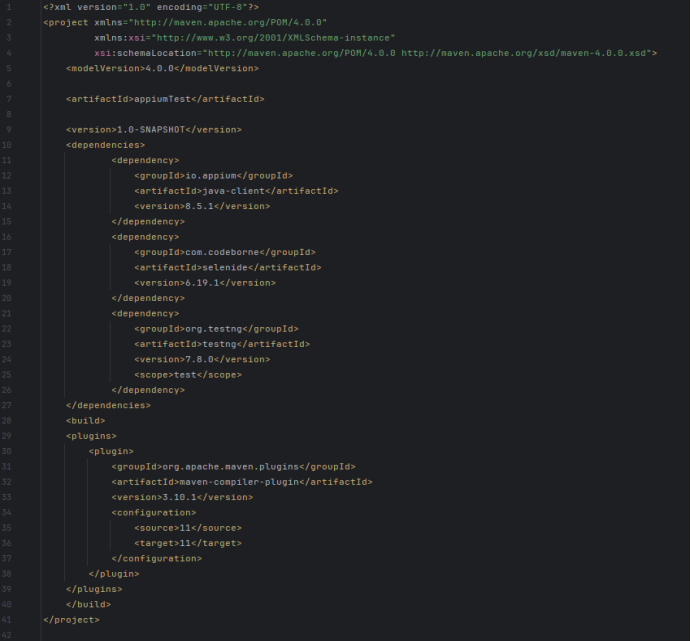
IntelliJ IDEA is used to create a project and set up the test run configuration. TestNG configuration should point to Appium Server at the following address http://127.0.0.1:4723/wd/hub .
3. Methodology and implementation
3.1. Page Object Model pattern
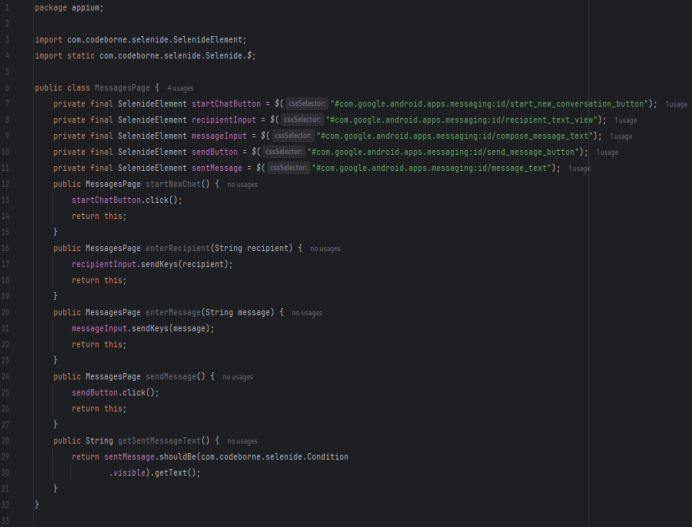
The Page Object Model (POM) pattern encapsulates interface elements and actions in separate classes representing application screens [3].
This provides modularity, simplifies code maintenance and improves test readability. The MessagesPage class is implemented for the Messages application:
3.2. Test using Appium and Selenide
The test initializes AppiumDriver, integrates it with Selenide and executes a script to send a “Hello World” message:
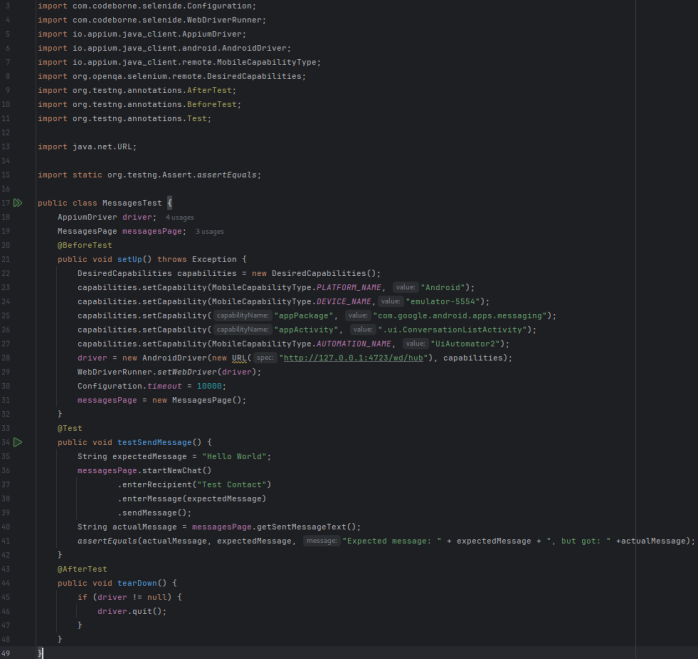
Selenide simplifies interaction with UI elements by automatically waiting for their visibility, reducing synchronization errors POM structures the test by making it high-level and intuitive.
4. Running the test and results
To perform the test, you need to launch Appium Server:
|
appium --address 0.0.0.0 --port 4723 |
The Android emulator must be active and the Messages application must be installed. The test is executed in IntelliJ IDEA through TestNG configuration.
The results are displayed in the console: successful execution confirms correct sending and displaying of the “Hello World” message. In case of an error, e.g. due to a missing interface element, TestNG displays a diagnostic message.
The test demonstrates successful integration of Appium, Selenide and POM. The test execution time depends on the emulator performance and application stability. On average, the test is completed in 10–15 seconds on a standard emulator with API 30.
5. Conclusions and further research
The proposed approach combining Appium, Selenide and POM provides efficient automation of mobile application testing. Appium provides cross-platform support, Selenide simplifies test writing, and POM improves test maintainability. Detailed environment customization, including Android SDK and UiAutomator2 driver, ensures test stability.
Limitations of the approach include dependence on the stability of interface element identifiers, which may change when the application is updated, and the need to customize the emulator or the real device. In addition, emulator performance may limit the speed of test execution.
Future research could focus on:
— Integration with cloud-based testing platforms such as Sauce Labs or BrowserStack to support a wide range of devices.
— Development of adaptive tests for handling dynamic item identifiers.
— A study of test performance on real devices compared to emulators.
References:
- Appium Documentation, http://appium.io/docs/en/2.0/ , Accessed: 2025.
- Selenide Documentation, https://selenide.org/documentation.html , Accessed: 2025.
- M. Fowler, Page Object, https://martinfowler.com/bliki/PageObject.html , Accessed: 2025
- Android Developer Documentation, https://developer.android.com/studio , Accessed: 2025.
- Node.js Official Website, https://nodejs.org , Accessed: 2025.

